Wow, that really is interesting history!
The gradual diversion of one big port into two smaller ports is a plus for keeping the gasses from going through too many sharp transitions but results in more wall surface area which leads to more friction which can hurt flow. It's hard to say which is better without calculating or performing a CFD analysis. Of course you'll have those pesky throttle plates in the way and the ~120° turn from carb inlet to combustion chamber.
16 valve B motor - living the dream
-
Geoff

- Team Turbo Troll Crew
- Posts: 3890
- Joined: Fri Oct 20, 2006 3:31 pm
- Nickname: Geoff
- Number of Saabs currently owned: 6
- Location: Nude Humpshire
Re: 16 valve B motor - living the dream
The kind of dirty that doesn't wash off 
-
DrewP

- Posts: 2084
- Joined: Wed Dec 26, 2007 8:27 pm
- Nickname: TANK
- Number of Saabs currently owned: 1
- Location: Monrovia, CA
Re: 16 valve B motor - living the dream
Geoff wrote:Of course you'll have those pesky throttle plates in the way and the ~120° turn from carb inlet to combustion chamber.
Swirl, baby, SWIRL!
"You can educate ignorance, but you can't fix stupid."
Re: 16 valve B motor - living the dream
So the head is coming along nicely, but now its time to turn a little attention to the block.
The notes from SAAB that came with the head have a few pages describing the modifications that must be carried out on the block. The main modification is to the rear jackshaft journal. They must have known a problem existed at high rpm use with the standard jackshaft, and the additional radial load that the tensioned belt put on the shaft (over the standard chain) probably exacerbated the problem further.
The modification involves boring the block out to 45mm, cutting an oil groove on inner diameter of the new bore, grinding the jackshaft down to 37mm and turning a bronze bearing and pressing in the block.
I was a bit concerned about being able to bore the block on the firewall side with accuracy to the small journal on the flywheel side, but after talking it over with some engine machinst they assured me that it could be done under a bridgeport as the journal measured out to be dead nuts perperdicular with the face of the block.
-
airsweden

- Posts: 756
- Joined: Mon Apr 16, 2007 2:36 pm
- Number of Saabs currently owned: 0
- Location: Oceania
Re: 16 valve B motor - living the dream
have you been in touch with the fella in CA with the other unfinished head that popped up in pics here? seems like he ought to try to get in on this action. truely awesome by the way. makes me a little less of a pessimist.
99 problems but a SAAB ain't 1
Re: 16 valve B motor - living the dream
However, before I started on the block mods I realized that now would be the perfect opportunity to rough out and indicate the journals on the rear timing cover that needs to be made. The rear timing cover is one of the largest single pieces that I am missing from the kit and drawings.... and I will have to make it from scratch.
Because the jackshaft is now driven by a belt, its pulley is now external to the engine and a seal will be needed on the timing cover.
I would have the engine under the bridgeport indicated dead center on the jackshaft journal already, It would be super easy to drop a locating hole through a roughed out timing cover doweled to the block at the same time, and it wouldnt be much work to slide over and indicated the crank jounrnal location on the cover at the same time.
Sooo....
Its time to cut some more metal!
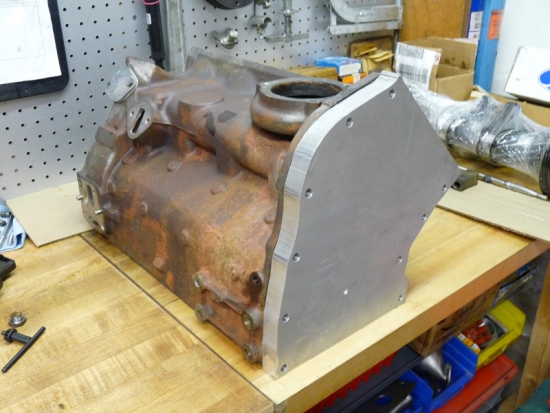
Here is a standard B-motor timing cover.
As you probably know, the timing gear is chain driven and "wet". I'll need a plate that is basically flat except where the shafts come through and the seals mount. Additionally, there is a raised area along the lower edge to seal against the gearbox.
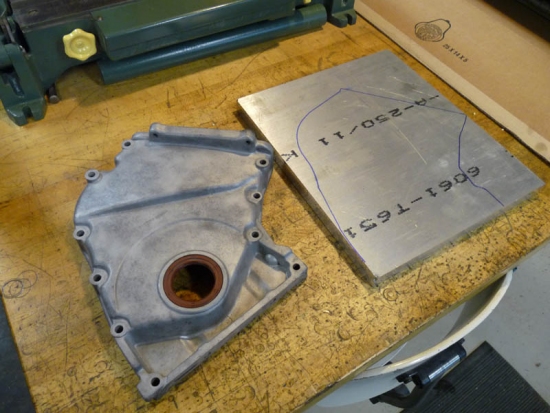
On the right in the above picture is a piece of 1" thick aluminum plate that, you guessed it, will become the new timing cover someday.
Because the jackshaft is now driven by a belt, its pulley is now external to the engine and a seal will be needed on the timing cover.
I would have the engine under the bridgeport indicated dead center on the jackshaft journal already, It would be super easy to drop a locating hole through a roughed out timing cover doweled to the block at the same time, and it wouldnt be much work to slide over and indicated the crank jounrnal location on the cover at the same time.
Sooo....
Its time to cut some more metal!
Here is a standard B-motor timing cover.
As you probably know, the timing gear is chain driven and "wet". I'll need a plate that is basically flat except where the shafts come through and the seals mount. Additionally, there is a raised area along the lower edge to seal against the gearbox.
On the right in the above picture is a piece of 1" thick aluminum plate that, you guessed it, will become the new timing cover someday.
Re: 16 valve B motor - living the dream
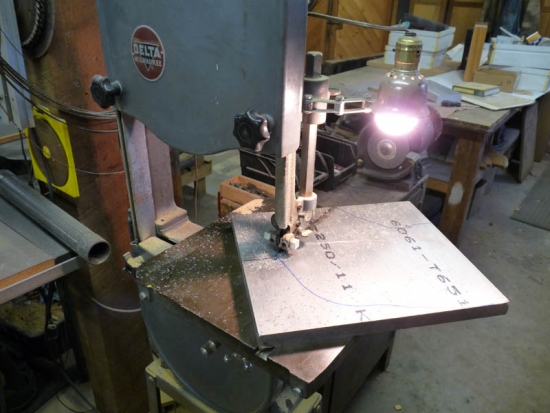
A few minutes with the trusty bandsaw and the piece is roughed to shape.
Then the hole locations are simply transfer punched through the standard cover and drilled on the drill press. The holes do not provide critical alignment. There are two dowel pins that come off the block.... these are located off the block with stubby little 10mm dowels turned to a point on the lathe and transfered with a light hammer tap to the aluminum plate.
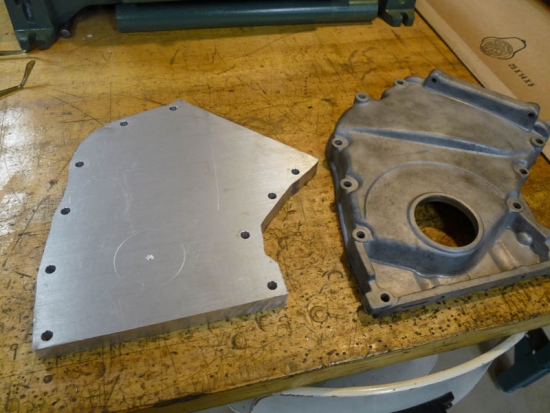
and fit up to the block:
yep, that will be close enough for now!
Then the hole locations are simply transfer punched through the standard cover and drilled on the drill press. The holes do not provide critical alignment. There are two dowel pins that come off the block.... these are located off the block with stubby little 10mm dowels turned to a point on the lathe and transfered with a light hammer tap to the aluminum plate.
and fit up to the block:
yep, that will be close enough for now!

Re: 16 valve B motor - living the dream
Any thoughts on how you will provide the two bolts for the transmission on the bottom edge of the timing cover? What did SAAB do?
__________________________________
Slow is smooth, smooth is fast
Slow is smooth, smooth is fast
Re: 16 valve B motor - living the dream
Mezzanine wrote:Any thoughts on how you will provide the two bolts for the transmission on the bottom edge of the timing cover? What did SAAB do?
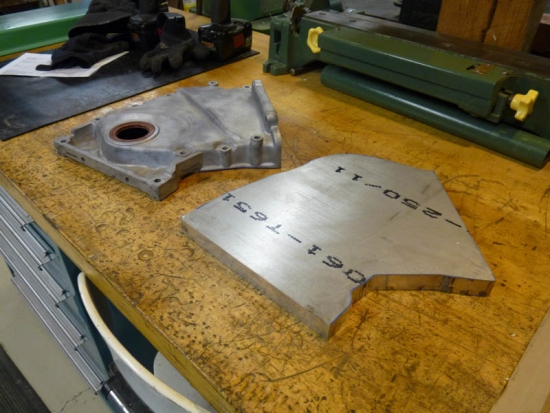
The bolts will still be there, thats one of the reasons I had to start with such a thick hunk of plate, to have enough room for the bolts. You can get a sense of the general shape of the cover from this picture:
Re: 16 valve B motor - living the dream
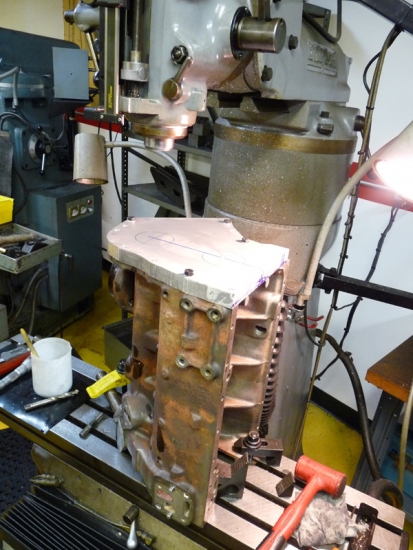
So with the roughing out of the timing cover out of the way I can carry on with the block modifications. Sometimes its annoying when those little side projects get in the way, but ultimately it will same time to be able to lay that out critically with the bores of the engine.
The block is hoisted up onto the bridgeport. This bridgeport has a riser block under the head to give us the clearance needed to get over the engine on its end, with space for tooling as well.
The bore is indicated to zero on the machine and the tables are locked. The "tram" (squareness of the head to the table) is also checked beforehand, Also as I mentioned before, the block ends were dead on square to each other, which meant our bore would be true once indicated.
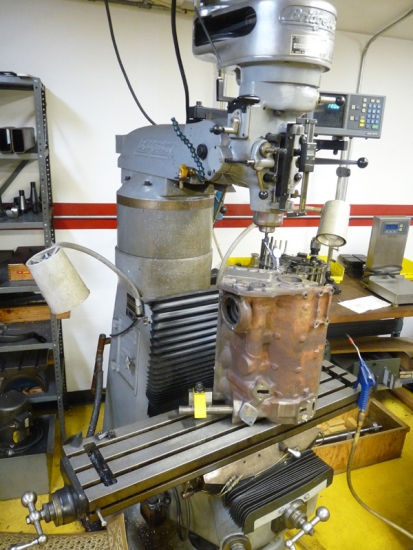
Then the bore is brought out from 40 to 45 mm in small passes. Just like on a lathe, you are removing twice the radius with each cut, so this didnt take very long at all.
The block is hoisted up onto the bridgeport. This bridgeport has a riser block under the head to give us the clearance needed to get over the engine on its end, with space for tooling as well.
The bore is indicated to zero on the machine and the tables are locked. The "tram" (squareness of the head to the table) is also checked beforehand, Also as I mentioned before, the block ends were dead on square to each other, which meant our bore would be true once indicated.
Then the bore is brought out from 40 to 45 mm in small passes. Just like on a lathe, you are removing twice the radius with each cut, so this didnt take very long at all.
Re: 16 valve B motor - living the dream
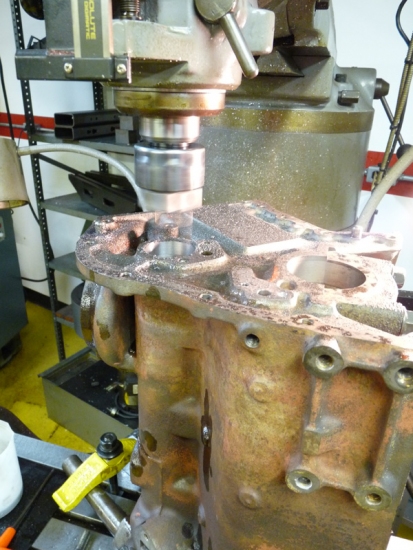
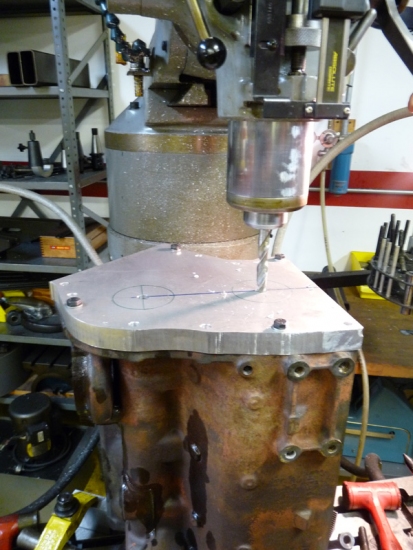
Once the bore was finished the timing cover was bolted down, aligned by the dowel pins and first center drilled, then bored out to 1/2" so I can easily get an edge finder or indicator in there later to align.
The jackshaft journal center:
and then the crankshaft:
The jackshaft journal center:
and then the crankshaft:
Re: 16 valve B motor - living the dream
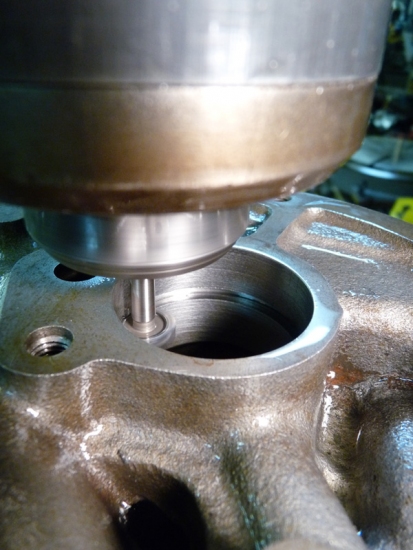
The next step was to open up an oil groove along the bore. The standard oil supply hole for the jackshaft journal comes right up from the rear most main bearing. This means that the oil hole and groove in the journal would be near the point of the greatest radial loading of the bearing (due to how the belt wraps the pulley) - obviously this is less than ideal.
So what SAAB calls for is bringing the oil supply around to the top of the bearing by routing a groove along the outside of the bore in the block.
I should mention that all the instructions for this were written in swedish, and a very old style swedish at that, so it took me a little while to figure out exactly what they wanted accomplished, but once pieces of it started to come together the entire picture became clear and started to make sense.
In order to make this cut we had to mount the block up on a rotary table - Josh is the maestro of the rotary table and he helped out with this.
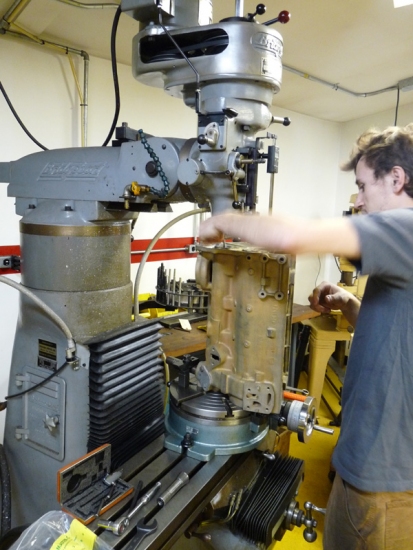
The block's journal is indicated to zero on the rotary table first, so that as we rotate the entire block on the table the journal stays centered.
A small slot cutter is mounted up in the quill and then one axis of the table moved out to just touch the journal. Then with small passes with a deeper cut each time (moving a axis on the main table) the groove is brought about about 120 degree from its original location on the bottom of the journal:
So what SAAB calls for is bringing the oil supply around to the top of the bearing by routing a groove along the outside of the bore in the block.
I should mention that all the instructions for this were written in swedish, and a very old style swedish at that, so it took me a little while to figure out exactly what they wanted accomplished, but once pieces of it started to come together the entire picture became clear and started to make sense.
In order to make this cut we had to mount the block up on a rotary table - Josh is the maestro of the rotary table and he helped out with this.
The block's journal is indicated to zero on the rotary table first, so that as we rotate the entire block on the table the journal stays centered.
A small slot cutter is mounted up in the quill and then one axis of the table moved out to just touch the journal. Then with small passes with a deeper cut each time (moving a axis on the main table) the groove is brought about about 120 degree from its original location on the bottom of the journal:
-
Geoff
- Team Turbo Troll Crew
- Posts: 3890
- Joined: Fri Oct 20, 2006 3:31 pm
- Nickname: Geoff
- Number of Saabs currently owned: 6
- Location: Nude Humpshire
Re: 16 valve B motor - living the dream
I have a block that could use that modification due to some scoring in the journal. Want to do another? 
The kind of dirty that doesn't wash off
Re: 16 valve B motor - living the dream
Geoff wrote:I have a block that could use that modification due to some scoring in the journal. Want to do another?
I might be able to do another at some point, although its nothing that any good machine shop couldnt do given good instructions, probably much quicker than I could. Making the bronze bearing is the next step, and that will be pretty critical.
Re: 16 valve B motor - living the dream
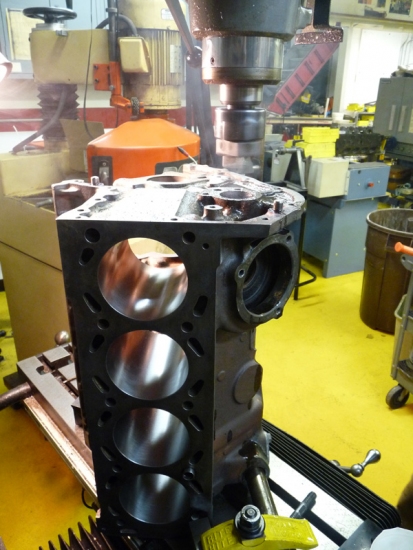
So the next step was to finish up the work on the bottom end. This block was pulled out of my shed where it sat for about 12 years open air without a head on it. I wish I would have snapped a picture of it before I started cleaning it. It was spared from being scrapped a number of times simply because it got buried in a pile of firewood in the shed and forgotten about. Needless to say the bores were a little rusty. It also must have have been driven with a stuck ring for quite a while. The bores were really badly scored.
So I had the whole block bored to 91mm (2nd oversize) . I'll need custom pistons anyway, so this is no big deal. The crank checked out perfectly in spec which was not too much a suprise.
The bores turned out quite nicely:

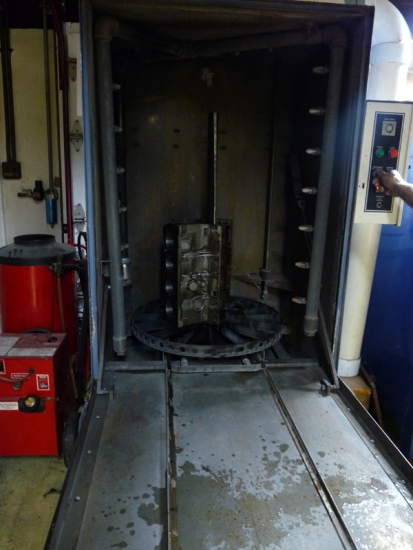
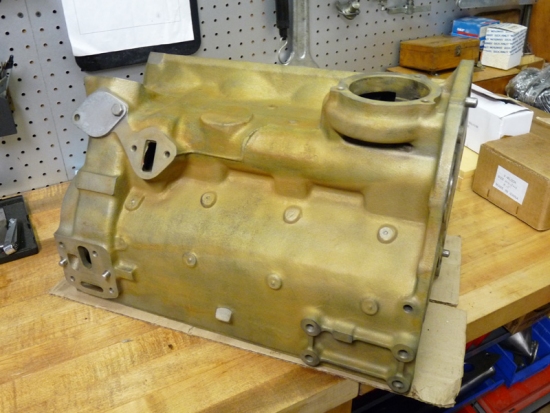
We sodablasted the whole block clean and then gave it a good rinse and then a hot tank.
Before:
After:
So I had the whole block bored to 91mm (2nd oversize) . I'll need custom pistons anyway, so this is no big deal. The crank checked out perfectly in spec which was not too much a suprise.
The bores turned out quite nicely:
We sodablasted the whole block clean and then gave it a good rinse and then a hot tank.
Before:
After:
Re: 16 valve B motor - living the dream
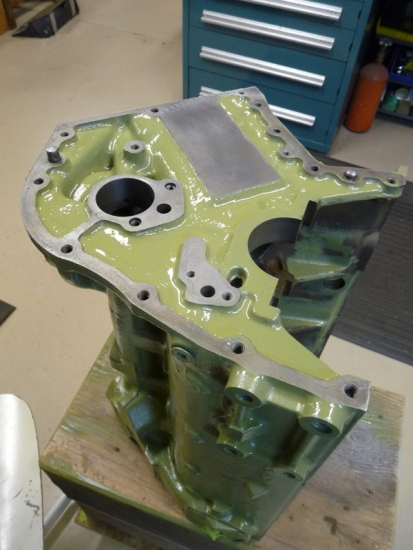
The next step while the block was still clean and grease free was to get some paint on it.
I masked off all the machined surfaces and shot a coat of special dupont paint on it. This stuff sticks like crazy and oil/solvents can't touch it once its hard. It also smells like the jersey shore in the summer The internal area of the casting that are rough are coated as well. This helps with oil return to the sump and helps keep sludge down as well.
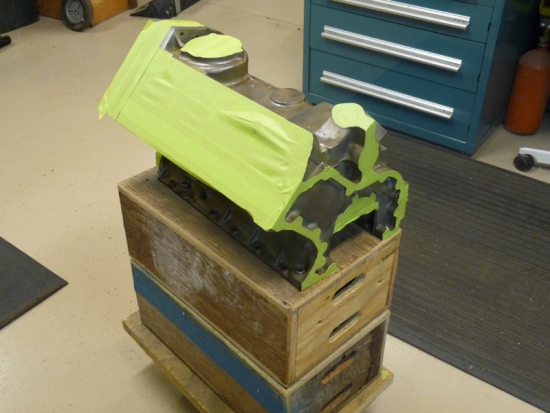
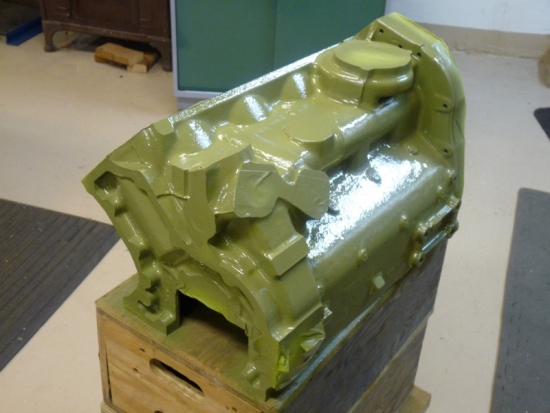
I masked off all the machined surfaces and shot a coat of special dupont paint on it. This stuff sticks like crazy and oil/solvents can't touch it once its hard. It also smells like the jersey shore in the summer
The internal area of the casting that are rough are coated as well. This helps with oil return to the sump and helps keep sludge down as well. Return to “Projects and Build Threads”
Who is online
Users browsing this forum: No registered users and 5 guests